

Android Onboarding: Enterprise Mobility Management (EMM) Devices Overview
- 6 months ago
- Updated
FollowNot yet followed by anyone

Android EMM (Enterprise Mobility Management) provides schools with full management control over Android devices. There are two enrollment options available: fully managed (Android 5.0+) and managed profile (Android 5.1+).
Enrolling Fully Managed Devices
The fully managed enrollment option is designed for school-owned devices. This allows schools to enforce a comprehensive range of management policies on the entire device.
#Note: To fully manage your devices, a factory reset is highly recommended. This will provide the highest level of control over your devices.
Click here to be directed to the Fully Managed enrollment process.
Enrolling Managed Profile Devices
For home-owned or BYOD (Bring Your Own Device) devices, you can set up a work profile. This feature, built into Android 5.1+, allows work apps and data to be stored in a separate, self-contained space within a device. Students can continue to use their devices as usual, with all personal apps and data remaining on the device's primary profile.
#Note: This option should be used for home-owned devices that cannot be factory reset.
In this scenario, Mobile Guardian will only control the "work" side of the device, while the user can still use the "personal" side without restriction.
Click here to be directed to the Managed Profile enrollment process.
Please let us know if you found this helpful!
Thanks for reading! 🙂
Android Onboarding: Part 1 - Setting Up Android Enterprise Mobility Management (EMM) with Google Workspace
- 4 months ago
- Updated
FollowNot yet followed by anyone
Android Enterprise Mobility Management (EMM) enhances control over your organisation's Android devices. This includes comprehensive device management and the ability to silently install or remove applications.
Preparing Your Organisation for EMM:
Google Workspace Account Enrollment
To set up an Android Enterprise using Google Accounts, your organisation must:
Have a Managed Google Domain: Refer to Get Started with Google Workspace for Education. Each domain can only be linked to one EMM console, and the organisation must follow a verification process to prove domain ownership.
Leverage Existing Google Workspace Infrastructure: For organisations using Google Workspace, existing domains and identities can be utilized. Google Workspace customers already have enterprise IDs, and users are set up with managed Google Accounts.
Let's go through the steps to set up Android EMM for your organisation.
Steps:
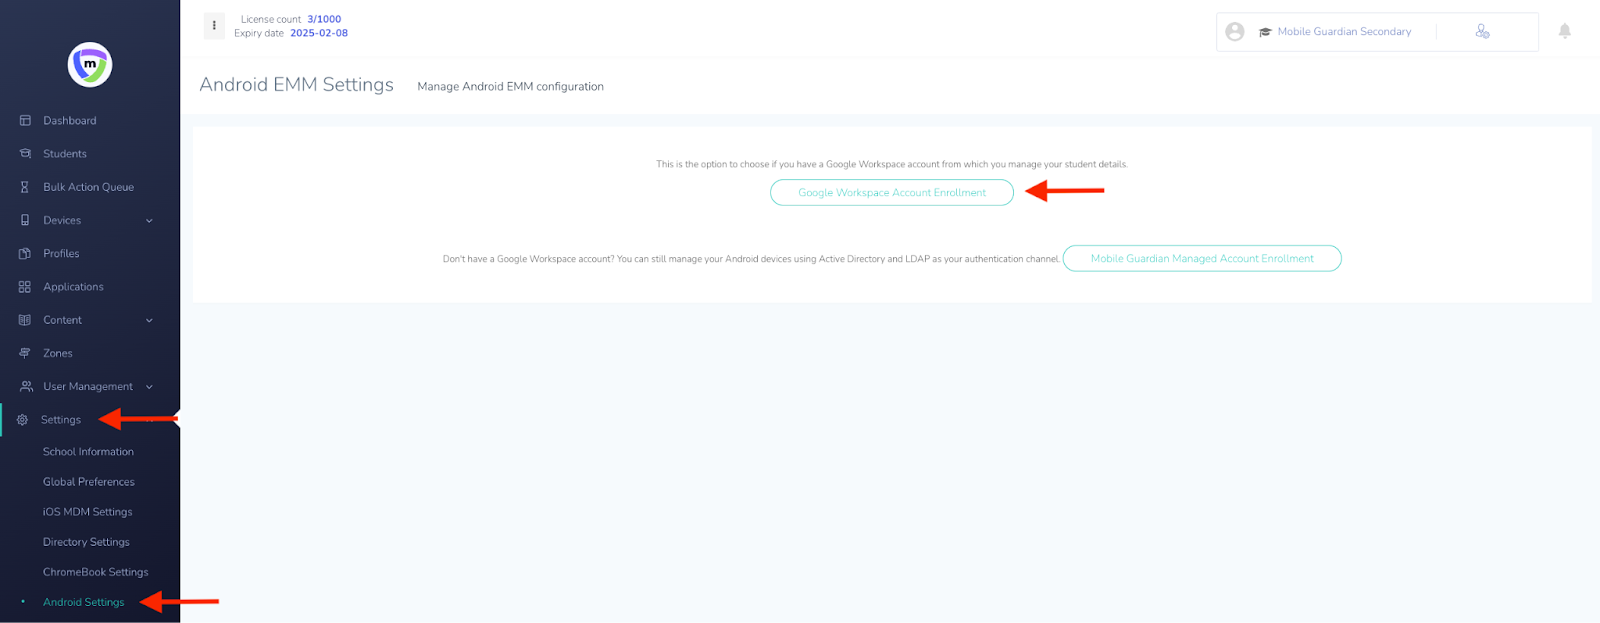
Access Mobile Guardian:
- Go to the Mobile Guardian school dashboard and sign in.
- On the school dashboard, click on the "Settings" menu in the left panel.
- Select "Android Settings" from the dropdown menu.
- Click on the "Google Workspace Account Enrollment" button.
Sign In to Google Admin Console:
In another tab, sign in to the Google Admin console at admin.google.com as a super administrator for your domain.
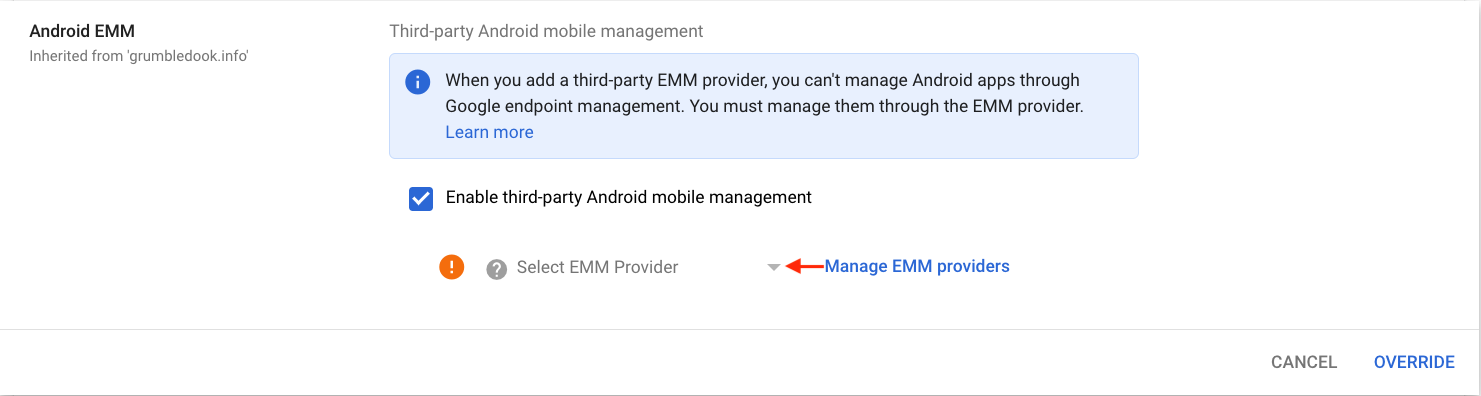
Configure Third-Party Integrations:
- Click "Devices" > "Mobile & endpoints" > "Settings" > "Third-Party integrations".
- Select the organisational Unit (OU) you wish to use for the EMM enrollments.
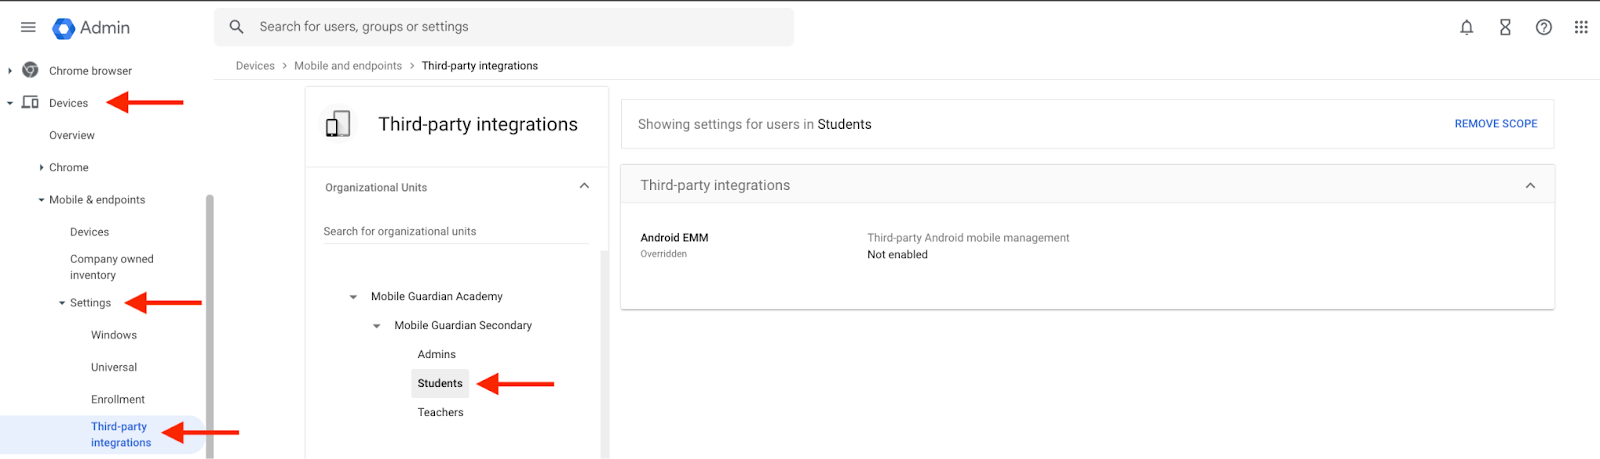
- Check the box labelled "Enable third-party Android mobile management".
- Click on "Add EMM provider" / “Manage EMM providers”
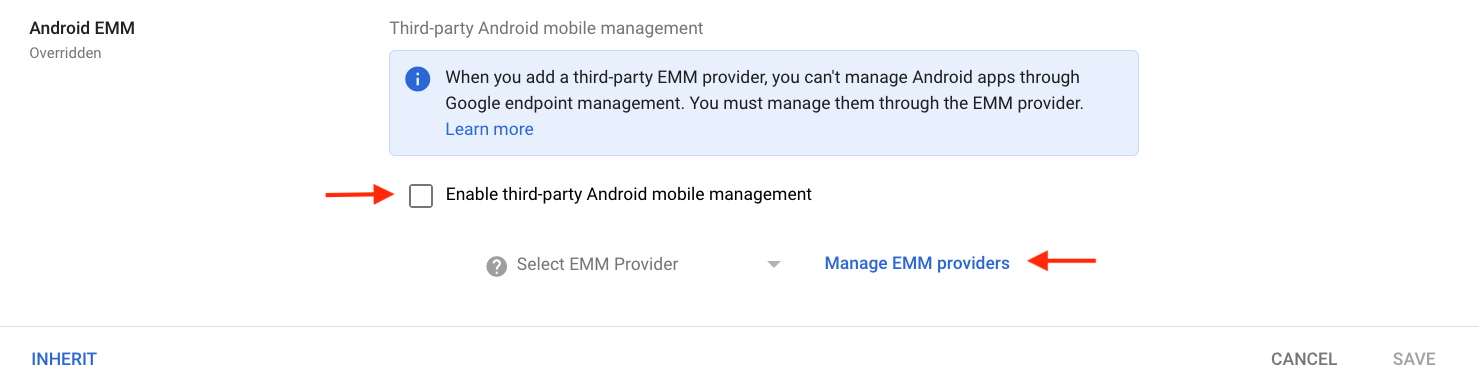
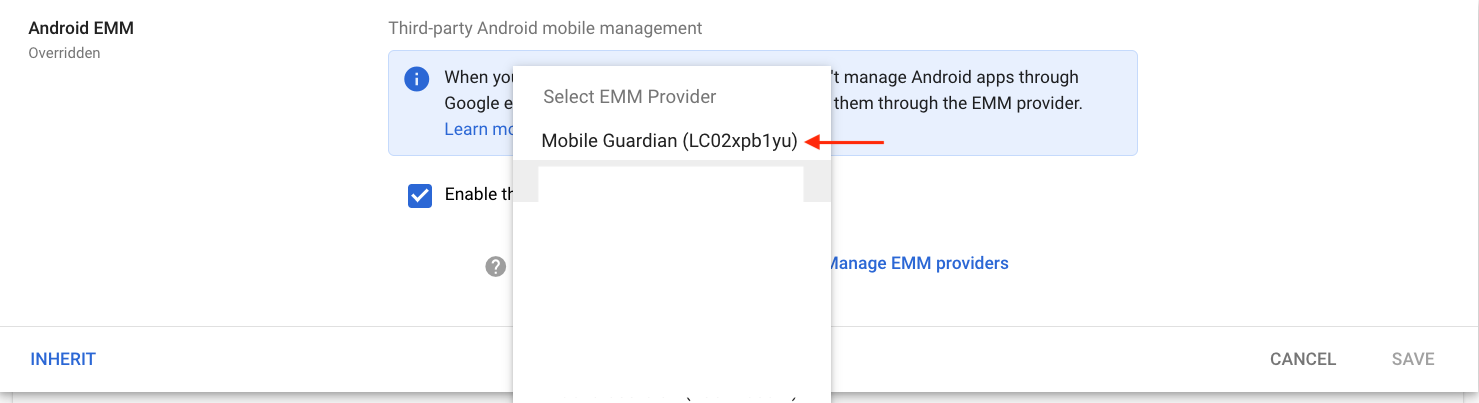
Generate or Copy Token:
- Copy the token (a string of characters) or click "Generate Token" to create a new one and then copy it.

#Note: If you're already using Android for Work, you can't view or generate a token. Ensure you select the correct EMM provider.
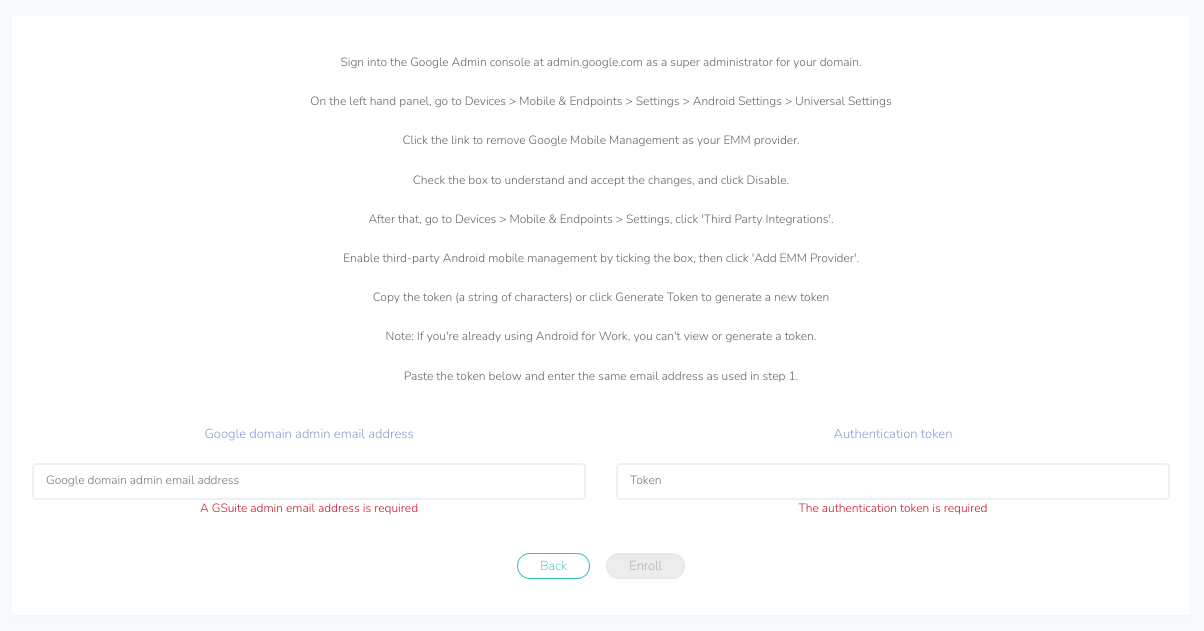
Update Mobile Guardian Dashboard:
- On the Mobile Guardian dashboard, add your Google domain admin email address used for the Google Admin Console.
- Enter the authentication token generated in the previous step.
Finalize Settings:
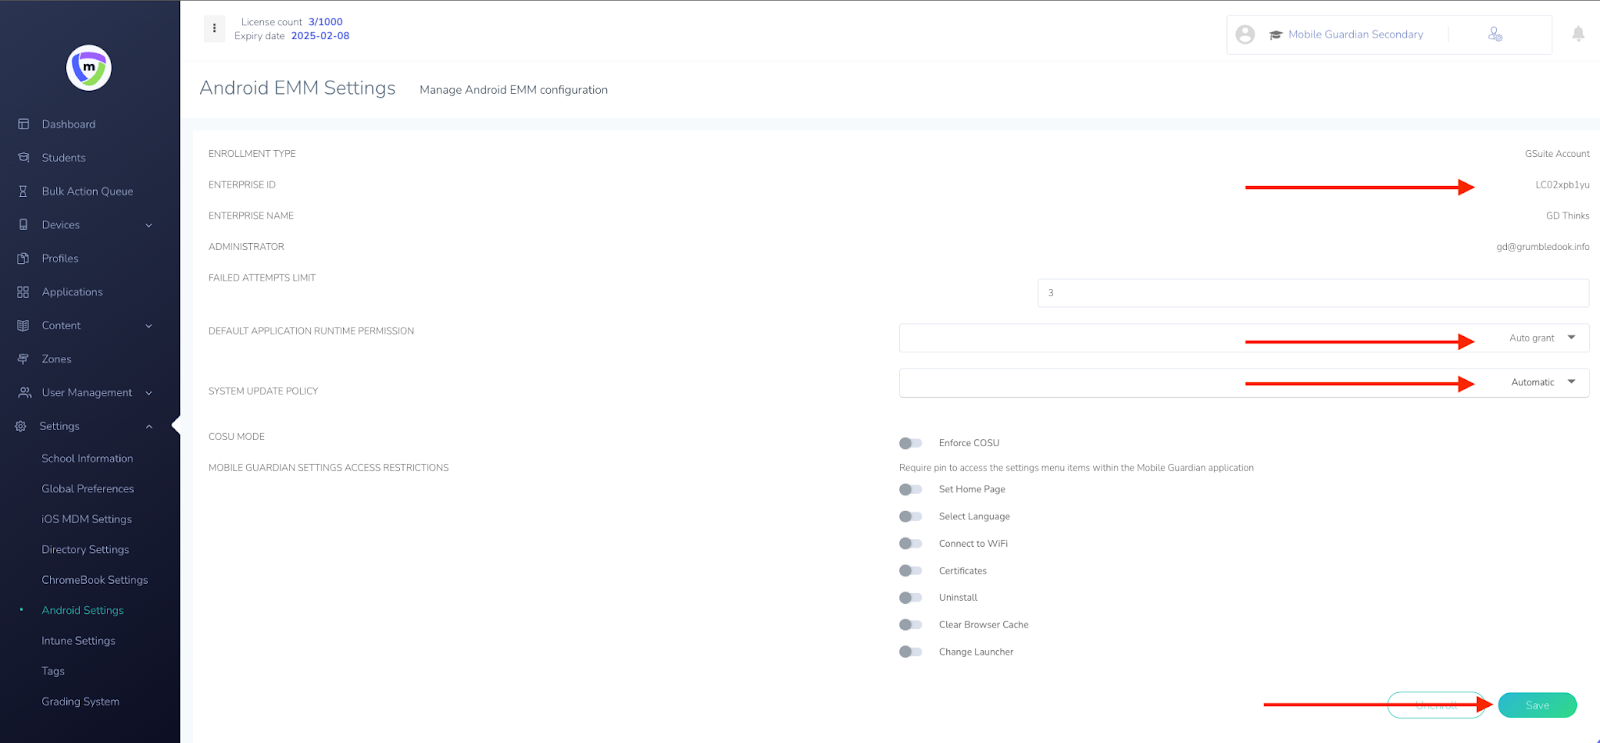
- Save the Android EMM settings.
#Note: Note the Mobile Guardian Dashboard Enterprise ID and navigate back to the Google Workspace Admin screen. The Enterprise ID on the dashboard should correspond with the ID shown in the EMM Third-party Integrations window.
- If it does not appear, refresh the browser for the page to update.
- Select the correct Enterprise ID from the dropdown and click "Save".
- This will bind Mobile Guardian to your Google Workspace organisational Unit.

Completion
After completing the steps, you will be redirected to the Mobile Guardian settings page showing the details of the enterprise created. On this page, you will have access to global settings for Android devices, such as default application runtime permissions and your system update policy.
Here you can enforce settings to Fully Managed Enrolled devices such as, setting devices into COSU Mode.
COSU Mode: COSU (Corporate-Owned Single-Use) mode is a kiosk mode for Android devices that locks the device to display only the Mobile Guardian interface. The user will only be able to access third-party applications that are added to the Mobile Guardian Launcher or the My Catalogue section on the device.
Possible Blocks for enrolment:
When performing an EMM enrollment, it is crucial to be aware of potential issues that might prevent or complicate the process. By addressing these potential blocks beforehand, you can ensure a smoother and more efficient EMM enrollment process. Below are two key factors to consider:
Configure Universal Settings:
- Ensure there are no Universal Settings enabled in your Google Workspace Console by navigating to "Devices" > "Mobile & endpoints" > "Settings" > "Universal settings" > "General" and turning off the "General" setting.
Existing EMM Provider:
- Ensure that there are no other EMM providers currently configured for your Organizational Units. If Google Mobile Management or any third-party MDM provider is already set up, you must remove it before proceeding with the enrollment.
Further Settings:
All other Android settings are managed through your profiles. With your enterprise now enrolled, you can navigate to the "Restrictions" > "Android" tab of any profile to view all settings available and Configure Android EMM Restrictions for devices.
EMM also supports silent installation and removal of applications. To add an application from the Google Play Store, use the search feature on the Applications page. Once added, the application must be approved from the application details page before it can be configured for installation on your device groups. For more information, see Configuring Android applications for silent install.
Please let us know if you found this helpful!
Thanks for reading! 🙂
Content 3
Finalize Settings:
- Save the Android EMM settings.
#Note: Note the Mobile Guardian Dashboard Enterprise ID and navigate back to the Google Workspace Admin screen. The Enterprise ID on the dashboard should correspond with the ID shown in the EMM Third-party Integrations window.
- If it does not appear, refresh the browser for the page to update.
- Select the correct Enterprise ID from the dropdown and click "Save".
- This will bind Mobile Guardian to your Google Workspace organisational Unit.
Completion
After completing the steps, you will be redirected to the Mobile Guardian settings page showing the details of the enterprise created. On this page, you will have access to global settings for Android devices, such as default application runtime permissions and your system update policy.
Here you can enforce settings to Fully Managed Enrolled devices such as, setting devices into COSU Mode.
COSU Mode: COSU (Corporate-Owned Single-Use) mode is a kiosk mode for Android devices that locks the device to display only the Mobile Guardian interface. The user will only be able to access third-party applications that are added to the Mobile Guardian Launcher or the My Catalogue section on the device.
Possible Blocks for enrolment:
When performing an EMM enrollment, it is crucial to be aware of potential issues that might prevent or complicate the process. By addressing these potential blocks beforehand, you can ensure a smoother and more efficient EMM enrollment process. Below are two key factors to consider:
Configure Universal Settings:
- Ensure there are no Universal Settings enabled in your Google Workspace Console by navigating to "Devices" > "Mobile & endpoints" > "Settings" > "Universal settings" > "General" and turning off the "General" setting.
Existing EMM Provider:
- Ensure that there are no other EMM providers currently configured for your Organizational Units. If Google Mobile Management or any third-party MDM provider is already set up, you must remove it before proceeding with the enrollment.
Further Settings:
All other Android settings are managed through your profiles. With your enterprise now enrolled, you can navigate to the "Restrictions" > "Android" tab of any profile to view all settings available and Configure Android EMM Restrictions for devices.
EMM also supports silent installation and removal of applications. To add an application from the Google Play Store, use the search feature on the Applications page. Once added, the application must be approved from the application details page before it can be configured for installation on your device groups. For more information, see Configuring Android applications for silent install.
Please let us know if you found this helpful!
Thanks for reading! 🙂
Transform your Mobile
Learning Program
FAQ's
We understand that sometimes students might get blocked when doing a Google Search while the option of "Allow Only Safe Traffic" is turned on. We want to help you understand why this might be happening and how to easily resolve it.
One common reason for these unexpected blocks has to do with a feature in Google Chrome called Network Prediction. This feature makes browsing faster by looking up website addresses in the background before a student clicks on a link in the search results. Whilst it's meant to be helpful, our Mobile Guardian Web Filter (or other security systems) might sometimes see this as unusual activity and block access.
If you're a Google Workspace administrator, you can easily turn off Network Prediction for your students.
Steps to Disable Network Prediction in the Google Admin Console:
1. Sign in to the Google Admin console (admin.google.com).
2. Navigate to Devices > Chrome > Settings.
3. Select the Organizational Unit (OU) that contains your student accounts (or the top-level OU to apply it to all).
As Google continues evolving its infrastructure, it will eventually deprecate support for Manifest v2 extensions. To ensure seamless compatibility of your ChromeOS devices with Mobile Guardian, please follow the steps below to update your settings within the Google Admin Console.
Steps to Configure Manifest v2 Settings in Google Admin Console
Open Google Admin Console and sign in.
From the Admin Console homepage, go to:
1. Devices
2. Chrome
3. and select Settings
The device types that were impacted are iOS and Chrome OS devices. However, due to the enrolment process utilized by Apple School Manager and Google Workspace for Education, iOS devices were the most impacted.
Unfortunately, this unenrollment of IOS devices has probably resulted in the loss of data on unenrolled iOS devices. However, regarding Chrome OS devices, simply resyncing the devices with your Dashboard should solve any connectivity issues being experienced.
iOS Devices
To investigate and solve any iOS device issues, the following investigation is to be carried out:
Review Device Status
Firstly, establish if devices are currently enrolled or require re-enrolment:
1. Open your Mobile Guardian Dashboard
2. Select Device in the left-hand navigation menu
3. Select iOS Devices
4. Review the list of devices on your Mobile Guardian Dashboard
Ensure your Chromebook settings are accurate and set up correctly. Proper configuration ensures seamless operation and synchronization of users and devices within an educational environment.
Mobile Guardian SettingsOpen the Mobile Guardian dashboard in your web browser.
Navigate to Settings > ChromeBook Settings.
Ensure that all fields are completed and up-to-date.